Afterwords
Securing APIs for IoT Devices: Step-by-Step Discovery and Implementing of Picobrew's APIs
This is a 2-part walkthrough of how to analyze and implement the "server-side" of IoT devices. IoT devices are not unalterable slabs of concrete - they can be modified - and this is step-by-step how I approached one. Take these steps, start digging into your own IoT devices and dive headlong into that proud tradition - voiding the warranty.
Project is here: https://github.com/duffyco/planbeer
I've been an avid brewer for a couple of years now. It's a great way to meet new people, experience trends from other parts of the world, and the world beats a path to your doorstep because of your great conversation (right?). However, given the 6-10 fully-devoted hours to get to the end product I took a break.
Automated brewing started to become mainstream in 2017 primarily led by a company called Picobrew. You put all the ingredients in, hit a button and out comes wort - the "sugar" water yeast is added to that makes beer. It's a life-changing product and I spend a max of 2hrs devoted time start-to-finish.
With Picobrew, everything is online and the machine is driven from the servers. Naturally, it follows the classic "phone-home" model. When I bought the machine, this was a plus for me as I wanted everything in one spot and I wanted to be able to view things remotely. I did my research: they had been in business for decade and had previously built models that were in use. They had both commercial and consumer product lines. Breweries that had them, raved about them. I understood the risk.
Part 2: The Auction

How do I figure out what it's Doing? I created a Raspberry Pi that acts as a Wifi hotspot since it's well-documented and I can completely control the traffic flow.
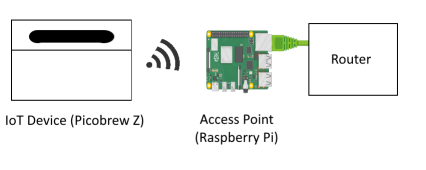
This should be straightforward, but multiple guides were conflicting. I used this script to setup the access point
I then used IPTables to flow the traffic to the right spot. In essence, we route the wifi adapter (wlan0) to the Ethernet connection to the router (eth0) and forward (or masquerade) the traffic.
sudo iptables -A FORWARD -i eth0 -o wlan0 -m state --state RELATED,ESTABLISHED -j ACCEPT
sudo iptables -A FORWARD -i wlan0 -o eth0 -j ACCEPT
sudo iptables -A POSTROUTING -o eth0 -j MASQUERADE
sudo apt-get install tcpdump
sudo tcpdump -i wlan0 -nn -w webserver.pcap
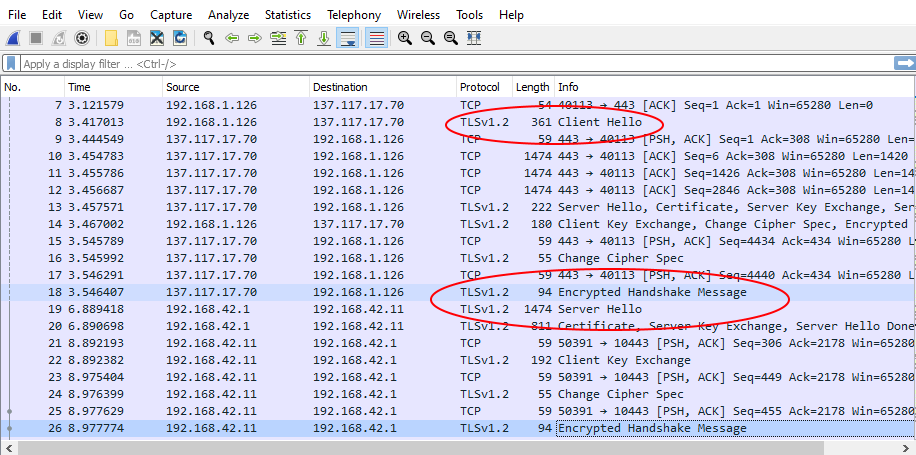
Using Wireshark we open the pcap file and find the traffic is all encrypted with HTTPS (TLS v1.2 here).
Part 3: An Interjection: "We're boned. Everything's encrypted". Or: "Don't Attack the Protocol. Attack the Parameters."
Of course, everything was HTTPS (TLS) encrypted, which is great for privacy, but not so great for seeing what this thing is doing. This doesn't mean the game's over though as there's a couple of levels to securing HTTPS from a client device
You're probably sharp enough to catch a key lesson in security: ask where the keys come from and you'll probably find a problem.
Encryption is great, but without validation of the key information and authentication of what provided the information can render the encryption useless. Look no further than the NSA who weakened the key generation (Dual_EC_DRBG) rather than the encryption itself (ECDSA). It's a great story
Or, we can modify the firmware. If any of the last three techniques above are done, we generally have to start modifying the client firmware. You can try attacking attributes of the certificate to see if they are validated such as fingerprint, Signing Key ID, Signing Certificate or even key attributes like the key to weaken the channel - Microsoft had a similar problem this year
In general, there are several techniques to prevent firmware modification. Mobile App developers have been leading the charge in this area as people like attacking their phones:
There's a whole field of research of Digital Rights Management (DRM) that's devoted to systems that have the clear-text, key and encrypted contents available on a device at the same time. Cubase recording software uses the last technique and has been quite successful, although most know these techniques simply buy time. This is extremely important for game developers as most sales occur in the first 3 months.
Part 4: Get on with it. Man-in-the-middle HTTPSFor PicoBrew, I started with the first technique: a man-in-the-middle proxy that impersonates certificates for all websites visited. These proxies terminate the TLS connection and can then re-establish the connection to the legitimate website. It does this by presenting a full certificate chain on connection: a self-signed CA and then a certificate in the name of the domain you are accessing signed by this self-signed CA.
Penetration testing is generally conducted this way. The trick is getting the target to accept your self-signed CA certificate. After that, everything is visible.
At the technical level, I used PolarProxy as it auto generates certificates, decrypts the traffic and sends to pcap files which I can then open in Wireshark. IPTables redirects the incoming 443 traffic to the PolarProxy software on port 10443. For Polarproxy, you do have to import their certificate from http://address:10080
Directions are here.I adjusted my firewall rules to (copy to rules.test)
# Generated by xtables-save v1.8.2 on Sat May  2 01:00:22 2020
*filter
:INPUT ACCEPT [135610:125207477]
:FORWARD ACCEPT [510:149537]
:OUTPUT ACCEPT [75179:29500202]
-A INPUT -i wlan0 -p tcp -m tcp --dport 10443 -m state --state NEW -j ACCEPT
COMMITj
# Completed on Sat May  2 01:00:22 2020
# Generated by xtables-save v1.8.2 on Sat May  2 01:00:22 2020
*nat
:PREROUTING ACCEPT [3721:1042311]
:INPUT ACCEPT [3439:376350]
:POSTROUTING ACCEPT [262:23200]
:OUTPUT ACCEPT [1767:114249]
-A PREROUTING -i wlan0 -p tcp -m tcp --dport 443 -j REDIRECT --to-ports 10443
COMMIT
# Completed on Sat May  2 01:00:22 2020
sudo iptables -F
sudo iptables-restore < rules.test
/home/proxyuser/PolarProxy/PolarProxy -v -p 10443,80,443 -x /var/log/PolarProxy/polarproxy.cer -f /var/log/PolarProxy/proxyflows.log -o /var/log/PolarProxy/ --writeall --certhttp 10080 --insecure
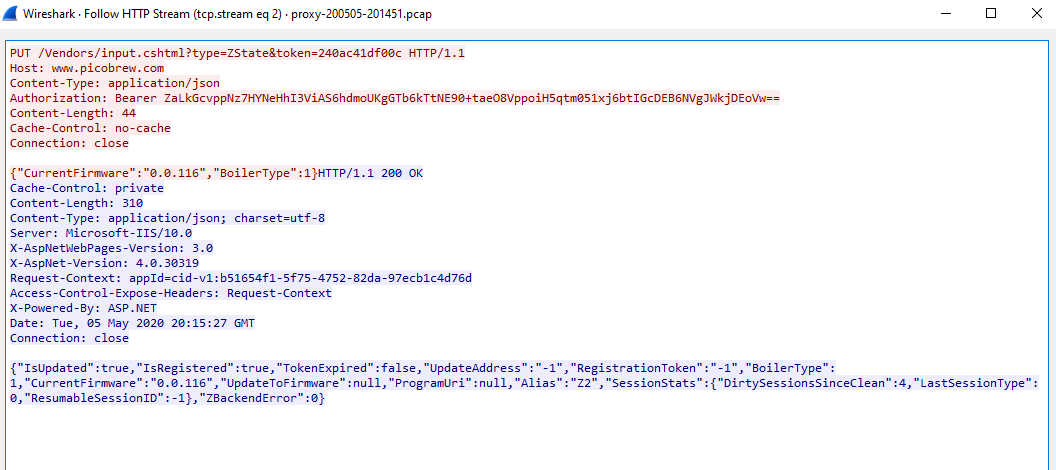
I grabbed the pcap file from /var/log/PolarProxy and I looked at Wireshark:
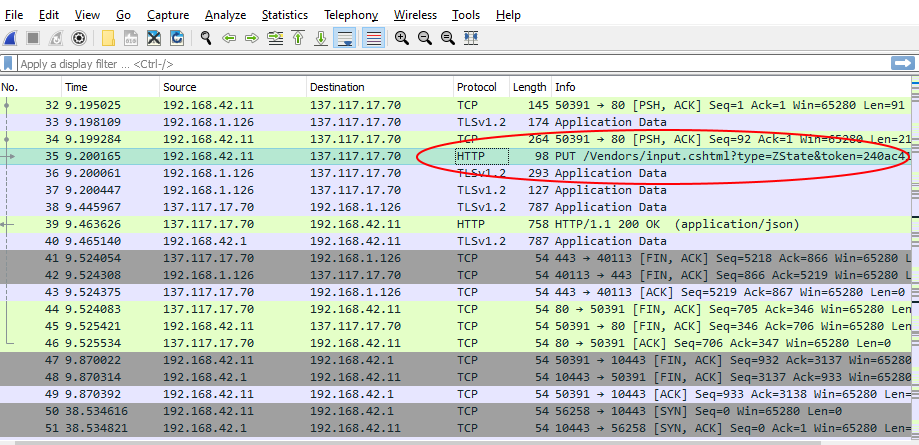
And then decoded the HTTP as a stream:
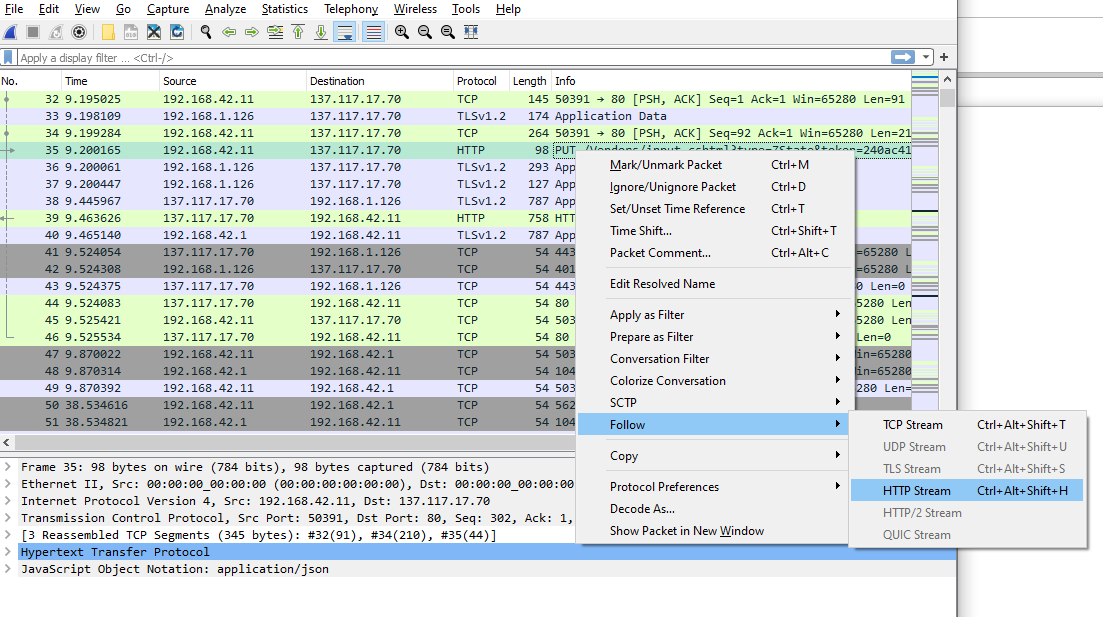
And we have a machine handshake!
At this point, I took a breath and so should we. Next time, I'll cover the implementation and the bumps.
Lastly, I'm hoping none of this work is necessary long-term. Picobrew makes a great product and I'm hoping the best is yet to come.
"A great product is one that you're angry when it goes away. If your customers are stressed and pissed when things stop, you've got something there." - Guy Kawasaki
The Paved Road
"The question really seems to be 'What's going on here?'" - Mamer
I've been immersed in Richard Rumelt's Good Strategy/Bad Strategy thanks to @jessfraz . It's a great read for anyone working on setting Security Strategy. When discussing with others about risk strategy it often boils down to "secure all the things, all the time". To my mind this leads to high burnout as people then get inadvertently specialized by having to work in the same space to meet demands and other priorities mount and get nibbled at randomly.
According to Rumelt, you first need a diagnosis about why your particular situation is hard, then select pivot points to maximize efforts and finally a coherent set of actions to drive towards those pivot points.
We can grab a beer and cry together about the first one, have dinner and make suggestions about the second but the actions follow a clear path: The Paved Road.
Strategy
Rumelt argues that a "Strategy" must be consistent and have a distinct perspective. It does not entail saving the world or making a 20% P&L gain next quarter. How often have we seen strategy that involves "providing world-class security" or some KPI that improves by 5%? Quite often, this is followed by a request for a bag with dollar signs and a discussion of planned cost-efficiencies.There's no doubt about it, investment to mitigate risk with a security program is not typically front-and-center for a business that is not in a high-security focus. In fact, across clients and customers I've advised over the years, risk tolerance can sometimes be incredibly high. This leaves two immediate options for advocating for investment: Fear, Uncertainty and Doubt or documenting risk and waiting for the day of reckoning. This is not ideal.
My personal belief is that security is fundamentally a feature. It should generate revenue through meeting a customer need, creating a customer want or by providing ancillary services alongside delivery of a main product. At the far side of the spectrum, I prefer security organizations with product capability built-in to either deliver secure products outright (like PKIs) or provide critical components of mainline products (Secure Communication Libraries). Over time, security will become too large to maintain its core task of risk management so it can spin these products out and resize to just the core risk team to begin anew.
The point though is what to do with the investment and how to drive it. I've come to the conclusion that you have to sell the "paved road". Handle the Incident Response and Compliance tasks but really get buy in on how things should work in the best case.
The Paved Road Example
In talking with a colleague, a while back, we ended up examining all obscure attack vectors and nation-state actors, while putting a great deal of controls between the technical team and the environment. Interestingly, in meetings, developers don't call security mechanisms "controls" - they call them "ridiculous obstacles". These 0.05% issues often pull the best of us in. It's fun.It took a few days, but it dawned on me that we hadn't discussed the paved road. What's going on here and what should happen in the typical case? The 99-th percentile. Afterwards we went back, discussed where the measures were coming from and how we envisioned them working when they weren't tripping the alarms. Buy-in was orders of magnitude better and yes, we did add some ridiculous obstacles that needed to be revisited.
The Rubber Hits the Road
For example, a paved deployment pipeline could look like this: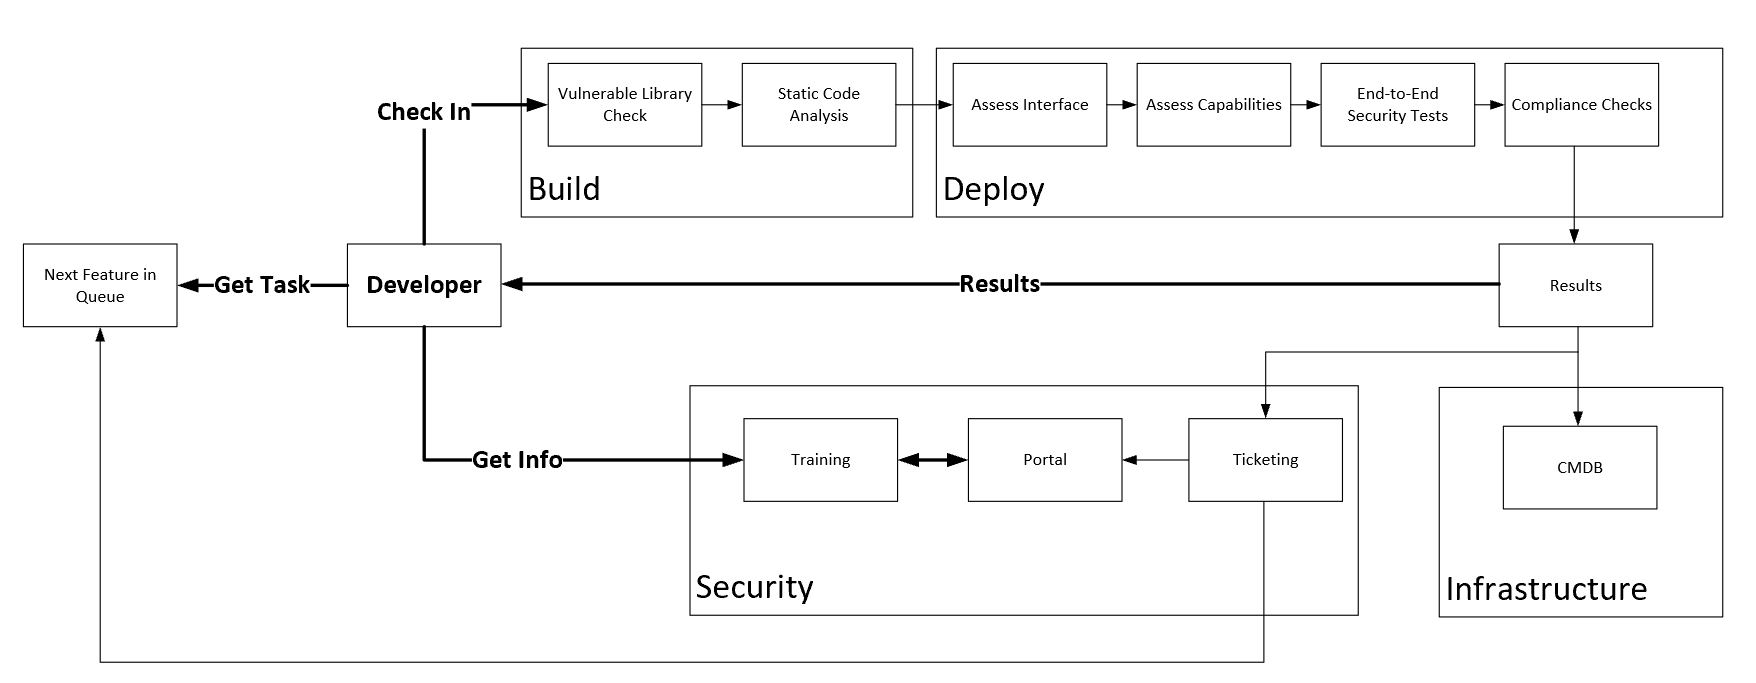
After onboarding training and an introduction to the security portal, a developer gets a task and checks in some code. The pipeline begins as the dependencies are scanned and static analysis is performed on the code. Deployment to the environment follows and we then itemize the state of the app: what's open, capabilities for patching/IAM/auditing, some end-to-end security checks are run (such as Burp if we're trying to eliminate a vuln class) and finally some compliance checks. Results are pushed to the developer and our tracking system with assets going to the CMDB.
When results come back to the developer, we continue to build out our portal that describes vulnerabilities and what we've seen in the past. Training is there to support these vulnerability classes and we're pushing to get it on-demand. Our security ticketing also may generate additional tasks to be injected, portal information to be updated or supplementary guidance to be tasked and delivered.
It is all about identifying re-enforcement loops - train the paved road and align all the work to get everything onto it.
THIS is What's Going On Here
This is a small example but highlights a key diagnosis: the application is target #1. For some networks are the focal point, or infrastructure components - they are still critically important - but the choice here is that the pivot point has moved to the app. This means we co-ordinate security activities around the app through developer and devops activities. This is especially true given the prevalence of serverless and PaaS options.[I'll plug my talk on Wardley Maps on coming to that diagnosis...]
Admittedly, 0-days are exciting - and they must be handled - but often security forces us into new and unique situations each time we respond to queries and incidents. This can be a rabbit hole.
When creating strategy, remember that teams can't work without a specification - get some asphalt and show people the Paved Road. Find your happy path.
Kubernetes on Raspberry Pi 4
Creating a K8S Cluster on Raspberry PI 4s w/ Latest Raspbian
With all the recent sales at buy a pi.ca , I decided to upgrade my home systems to use Raspberry Pi 4's. We run about 30 services internally including phone, TV, email, nextcloud, web servers and various devices. To keep this running smoothly I containerize everything and use Kubernetes to co-ordinate the uptime.
This has several advantages for me:
With the Raspberry Pi 4, and the latest Raspbian, I've run into some new gotchas:
Note on storage: Before we begin, think about how you're going to store your data - I use a server that exports NFS and Samba mounts and it has worked out well thus far. It may not work for everyone as performance becomes a huge factor. I'm pretty sure Rogaine sponsors access rights in unix. You might end up pulling your hair getting user rights to align to your container and the share.
Setting up the Nodes
First get Rufus and burn the latest Raspbian to the SDCard.For those without monitors: putting an SSH file and wpa_supplicant.conf file in /boot will turn on SSH and auto connect to your wifi.
I have a script that does the following steps
# Setup your storage first
# I setup samba/nfs along with the mount points
# Install Docker
curl -sSL get.docker.com | sh && \
sudo usermod pi -aG docker
# Disable Swap
sudo dphys-swapfile swapoff && \
sudo dphys-swapfile uninstall && \
sudo update-rc.d dphys-swapfile remove
sudo swapoff -a
# Enable cgroups
echo Adding " cgroup_enable=cpuset cgroup_enable=memory" to /boot/cmdline.txt
sudo cp /boot/cmdline.txt /boot/cmdline_backup.txt
orig="$(head -n1 /boot/cmdline.txt) cgroup_enable=cpuset cgroup_memory=1 cgroup_enable=memory"
echo $orig | sudo tee /boot/cmdline.txt
# Install kubeadm for k8s management
curl -s https://packages.cloud.google.com/apt/doc/apt-key.gpg | sudo apt-key add - && \
echo "deb http://apt.kubernetes.io/ kubernetes-xenial main" | sudo tee /etc/apt/sources.list.d/kubernetes.list && \
sudo apt-get update -q && \
sudo apt-get install -qy kubeadm
# Adjust docker daemon to avoid cgroups issue
cat > /etc/docker/daemon.json <<EOF
{
"exec-opts": ["native.cgroupdriver=systemd"],
"log-driver": "json-file",
"log-opts": {
"max-size": "100m"
},
"storage-driver": "overlay2"
}
EOF

mkdir -p /etc/systemd/system/docker.service.d
systemctl daemon-reload
systemctl restart docker
# Upgrade to a different kernel
sudo rpi-update

# Change to iptables legacy
sudo update-alternatives --set iptables /usr/sbin/iptables-legacy
Setting up the Cluster
I use a single Rpi master to drive the cluster. It's not super speedy, but it is resiliant. You need 3 RPis for a true HA control plane and I'd argue an external etcd. This is much simpler.
# Initialize the Cluster
sudo kubeadm init --pod-network-cidr 10.244.0.0/16
mkdir -p $HOME/.kube
sudo cp -i /etc/kubernetes/admin.conf $HOME/.kube/config
sudo chown $(id -u):$(id -g) $HOME/.kube/config
sudo sed -i 's/initialDelaySeconds: 15/initialDelaySeconds: 20/g' /etc/kubernetes/manifests/kube-apiserver.yaml

sudo kubeadm init --skip-phases=control-plane --ignore-preflight-errors=all --pod-network-cidr 10.244.0.0/16
docker ps | grep kube # - should be 8 (4 services + k8s PODs)
Note that CoreDNS will not come up until we install a CNI layer. I used flannel and had routing issues. Calico does not have armv7, but has arm64 - which doesn't work on 32-bit Raspbian. I settled on Weave.NET after much experimentation.
kubectl apply -f https://cloud.weave.works/k8s/net?k8s-version=$(kubectl version | base64 | tr -d '\n')&env.IPALLOC_RANGE=10.244.0.0/16
I used MetalLB for providing LoadBalancing capabilities on bare metal. It will automatically allocate External IPs for you when you deploy services.
kubectl apply -f https://raw.githubusercontent.com/google/metallb/v0.8.3/manifests/metallb.yaml
cat > metallb-conf.yaml <<EOF
{
	apiVersion: v1
	kind: ConfigMap
	metadata:
	namespace: metallb-system
	name: config
	data:
	config: |
	address-pools:
	- name: default
	protocol: layer2
	addresses:
	- 10.0.10.1-10.0.10.100
}
EOF

kubectl apply -f metallb-conf.yaml
Query everything to make sure it's running
$ kubectl get pods -a
NAMESPACE        NAME                               READY   STATUS                 RESTARTS   AGE
infra            gogs-5989f558d6-gsfsq              1/1     Running                0          3h3m
infra            registry-5fb7f56bb8-wb82x          1/1     Running                0          3h3m
kube-system      coredns-6955765f44-bwqtd           1/1     Running                0          3h3m
kube-system      coredns-6955765f44-qvrxc           1/1     Running                0          3h3m
kube-system      etcd-c1node00                      1/1     Running                89         7d4h
kube-system      kube-apiserver-c1node00            1/1     Running                32         7d4h
kube-system      kube-controller-manager-c1node00   1/1     Running                222        7d4h
kube-system      kube-proxy-r78wh                   1/1     Running                0          6d7h
kube-system      kube-proxy-vqjt4                   1/1     Running                23         2d3h
kube-system      kube-proxy-z74hc                   1/1     Running                0          2d6h
kube-system      kube-scheduler-c1node00            1/1     Running                225        7d4h
kube-system      weave-net-88k8q                    1/2     Running                12         2d8h
kube-system      weave-net-bmqzc                    2/2     Running                2          2d6h
kube-system      weave-net-cfgd9                    2/2     Running                26         2d8h
metallb-system   controller-65895b47d4-7c78d        1/1     Running                0          3h3m
metallb-system   speaker-2jvwj                      1/1     Running                0          2d8h
metallb-system   speaker-9jcpq                      1/1     Running                15         2d8h
metallb-system   speaker-dj6sb                      1/1     Running                0          2d6h
services         www-5c676fdf7b-hsvl9               1/1     Running                0          3h3m
services         wwwduffydev-7c597b5797-tgwbn       1/1     Running                0          3h3m

$ kubectl get svc -a
NAMESPACE     NAME            TYPE           CLUSTER-IP       EXTERNAL-IP     PORT(S)
default       kubernetes      ClusterIP      10.96.0.1        <none>          443/TCP
infra         gogs            LoadBalancer   10.106.104.145   10.0.1.100      3000:31515/TCP
infra         registry        LoadBalancer   10.104.109.150   10.0.1.101      5000:31809/TCP
kube-system   kube-dns        ClusterIP      10.96.0.10       <none>          53/UDP,53/TCP
services      www             LoadBalancer   10.98.70.150     10.0.1.102      80:31922/TCP
services www-duffy-dev LoadBalancer 10.106.174.191 10.0.1.103 443:30229/TCP$ kubeadm token create --print-join-command Done!
Hopefully it was pretty straightforward and you've got your cluster up and kicking. Once up, it will stay like this for a good while. The RPi 4 - and new Buster - have thrown some wrenches into the works. KSwapD0 still chews through the CPU and I've found that enabling ZRAM after startup has been helpful.Last note - swap can't be on unless you initialize the cluster that way so kubelet won't start. If I find that ZRAM is a good fix, I'll reinit the cluster that way. If you're not sure check it this way.
$ free -m
total        used        free      shared  buff/cache   available
Mem:            924         390         276          46         256         432
Swap:             0           0           0
Happy k8s-ing!
Quantum Cryptography
"Because no one knows for sure what a working quantum computer's capabilities will be" - NIST PQ Update 2019
The world has really jumped onto the post-quantum bandwagon it seems. When vendors come in to discuss their products, the topic of "post quantum resistant crypto" comes up - and usually within the context of their products being market leading. This is a landscape where the complexity is truly indistinguishable from magic so when there's discussion of future-looking-wizardry the end result is the question of whether we should prioritize post-quantum crypto.
Generally, if your implementation of PQ-Crypto will only affect internal components - ie: you have full control over the endpoints it will be used in, compliance is not a must and changes can be forced through the system - then by all means start now. Some use cases may be compelling enough to go through the winkles that will inevitably emerge.
However, some of us need interoperability and are concerned about backwards compatibility. Still others may also have dealt with Sev-1 outages caused by crypto migrations before. The bottom line is that we're not at the seventh inning stretch just yet.
There's a number of phases a crypto algorithm goes through before it becomes transparent to systems.
- The algorithm must be evaluated and standardized.
- The implementation must be standardized across libraries and produce a standard output and format.
- It must be adopted by an application and made to be useful within an app's specific context.
Step 1: Algorithm
In 2016, NIST (one of the big shepherds of crypto algorithms) announced a competition to deliver recommendations on PQ-crypto algorithms. NIST has narrowed it to 26 possible entries as of this writing with the competition concluding shortly. Dan Bernstein and Matthew Green are great for timely updates on the event.NIST is famous for last-minute changes and adjustments to meet their competition objectives. DES was changed at the last minute for protections against differential cryptoanalysis and SHA-3 (Keccak) was changed for performance reasons.
Many good algorithms, such as Bruce Schneider's Blowfish/Twofish, get removed from NIST competition and it becomes much harder to justify usage in products that have compliance obligations. Less focus is also given to them and implementation may vary highly if support is available at all.
In short, a PQ-algorithm may yet change, a vulnerability may be found or support may be dropped entirely.
There are three major types of PQ-crypto algorithms with different methods at their core for ensuring security:
Step 2: Implementation
Once standardized, the implementations need to properly code the algorithms and handle the variations. Messages encrypted in Java (Bouncycastle) must able to be deciphered in Apache (OpenSSL). AES had numerous Initialization Vector (IV) interoperability issues and ECDSA handled random numbers per message by standardizing a place for it in the output. Depending on the algorithms selected this implementation may take time for this to solidify.An exhausting problem was the transition to elliptic curves with the multiple variants permitted. When specified, NIST laid out curves from P160 to P521 in both random and prime formats. It was a fair amount of work to employ all of them, so you can easily find P256 and P384, but it's rare to see support for P521 or the random fields. Brainpool transition at the behest of BSI led to two types of curves with regular curves enjoying broad support and twisted curves rarely seen. (Another fun aspect is that libraries will often redefine what parameters are identified by which letter. "S" is a private key in some implementations while a field in the specification. Developers love these things.)
Step 3: Applications
So, we've standardized the algorithm and the implementations can now talk to each other. This is finally when applications can start using it.W3C can now define a Signed Info object, x.509 can now define signature fields and things like smartcard tokens and TLS connections can write procedures to handle the PQ-crypto-isms. At the start, these protocols are typically independent of the implementation. At the end, they can be locked in.
When using elliptic curves in x.509, applications decided to leave in the BER-TLV notation - extra bytes that define a structure - and it's not hard to determine what happened when others attempted to verify a signature without this knowledge. As a bonus, some fields in SignedInfo curve definitions are padded (P) and others are not (A&B). Some curves have leading 0x04 bytes, some do not. Small things like this need to be ironed out by the application specific standard.
Certificates used by PKIs could be a source of potential vulnerabilities as they move toward using PQ-Crypto. There is a concern that the new PQ algorithms are not classically resistant and, for example, could have problems with differential cryptanalysis. To prevent this, we have two signatures - one classical (RSA), one new (Ring-LWE) - if they both evaluate we've got a valid signature. However, what if one doesn't validate because the infrastructure is insufficient, what if the implementor chooses either or even worse, bolts it to only accept the new algorithm which isn't yet standardized? This is of course aside from the added performance and storage hit that comes with two signatures.
Lastly, I'd point to the Chrome implementation of "A New Hope" for TLS. It worked incredibly well for a given version of Chrome with a given version of OpenSSL - but doesn't work anymore. This is great experimentation - and was very interesting to get running - but highlights the remaining distance once we have an agreement on algorithms.
Thus far, few standard groups such as ISO have taken up the task with some having just recovered from the migration prior.